Saturday, January 26, 2013

Workshops by Donna

If you see this poster in your Hobby Lobby store, I will doing a one day workshop to teach the magic and fun of painting in oil.

Each workshop is one day beginning around 9 am and with a short break for lunch we will paint and have fun until about 4 pm.

The painting will be a 10 x 20" canvas with the water lilies already drawn on it for a smooth and easy start.

The Cullman class is full, but there are a few openings in Gulfport and Huntsville.

Hope you can join us. Class fee is $50. And that includes the canvas. We love beginners!

Friday, January 11, 2013

The last dance with a painting....

The last dance....

Welcome to the final edition of this project!  I hope you will join my blog so when I begin another project on-line, you will receive an e-mail and can follow along with us.  
I love teaching and sharing.  Thank you for joining me in this project!!
donna


I decided yesterday that I would finish this painting today.  From experience I know how an artist can get entranced in the comfort of a painting and avoid finishing it. 

Each evening. I spend time making my studio and palette right for the next session. 
 I use the time to think about what will be next.

 Consistency is the key.  I make labels for my classes that fit around the edges of the palette so you not only know where to put the colours, but you learn the names of each colour.
 This is a real confidence booster!


It is important to put out enough colour each time.  Having to stop and find a tube can be a real hassle and interruption... especially in the field.


I divided the final steps up in my mind and decided which step or area I would complete next.  Mentally, I moved all the other issues of the painting to the back of my mind and attacked the first step with confidence.

I offer advice to my fellow painters to avoid the opinions of most spouses... especially if they are engineers or accountants.  (we laugh!)  Hormonal teens fit in this list too.


Knowing my subject as I do, I cannot imagine this house without the big trees.  The trees had to be put in last as a framing device that gives us all the answers and stays accurate.  I added the Magnolia first on the left.

Note: I use damar "Retouch" varnish spray to "lift" the color if that last session has dried. Once the oil colour dries, it looks dull and flat so much that when you start painting over it, it does not visually blend and does not look right.  Take the painting outside, lay it flat and give it a light even coat of "retouch" varnish.  Careful not to over-do this as it will flow and streak once you stand it back up


The Magnolia began to look a little "arranged" or "cookie cutter" so I had to back up and relax to make it more natural.  If you are not an artist this might sound strange, but it works.

 Drinking, however does not work....

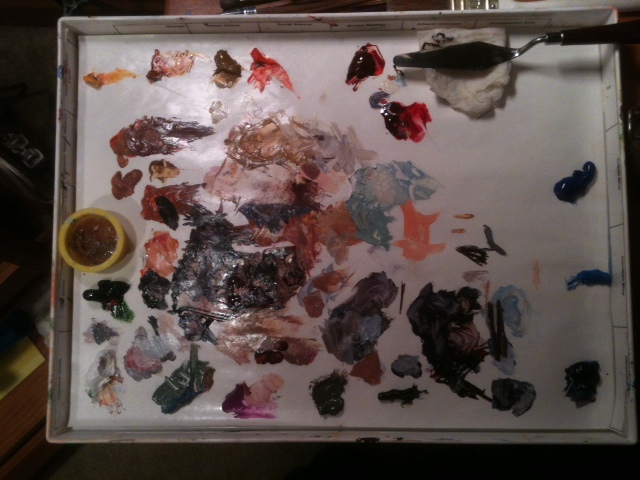
I show you my palette while working on the "greens" which can be a real key to a great landscape.  Learning to create shade of "grey green" is key to really great trees and things that grow in God's garden of beauty.  To make a certain area look vibrant, it is necessary that other areas appear dull... or grey.  Also, to make things appear in the distance, you have to make them even more grey... add more blue and orange along with white to see what a difference that can make. 

The right side of the canvas needed something as well, but not the tall oaks or heavy fig trees I remembered there.  I began adding a low branch of a pin oak and it morphed into a Wisteria type bush that I liked.  I am pretty sure the family will approve of this bit of artistic improvisation.


I finally signed the painting.  
  
I usually see things I could change, but it is probably best to let it go.  There are exceptions to this rule and each artist has to decide when the desire to "fix" something overrides the wisdom to leave it alone.


 There are no rules,  just good judgement.

donna peters
2013 


I have enjoyed sharing this blog with you.  I learn a little more about the BLOG thing each time I do it.  I love teaching what I have learned about art and myself.

This week I have taken 2 hours each day to get away from the painting and sketch out doors. 
In my 2013 to-do list I committed to doing a set of sketches for some note cards.  Each card will be a sketch from a place I really enjoy sitting with a view that on God can improve on.

Set your goals high and laugh at yourself.  Spend time with people who are living and not just "consuming" life and stuff.  

Have a great year and make everyday count!

If you live near one of the cities where I will be teaching a one day class at
 Hobby Lobby, I hope you will join us.

You can find all the information about the workshops on my web site:
www.donnapeters.com


***********************************

For those friends who paint with me on the coast,  our friend, Mary, is doing well.  
She sends her love!


Wednesday, January 9, 2013

A Painting Takes Shape

A Painting Takes Shape


I remind every artist who paints with me that each painting is like a kid.... at some time in the process of getting them ready for the world each looks like a complete disaster!  I have to remind myself of the same as I get a bit tired of the slower parts of the process and begin to doubt its value.

With the trees, back fields and sky painted, it was time to move on to the subject... the house!
This is where the brain kicks in and we choke up on our brushes.  We almost quit breathing when we get so anxious.  This is a great time to take a walk and talk to yourself about why you paint.... fun!!


I thought you might like to see the brushes I have used up to this point.  It is quite a variety.  The large one was used to blend the sky.  The natural bristle was perfect to paint the texture of the old boards on the house.
To paint weathered wood, do an under-painting that is about the darkest color in that area.  Avoid the temptation to use black and white to make shades of grey.  Instead, use red, blue green and maybe purple... don't forget the orange!!  Make an "optic black" out of red, green and blue.  it has life in it and will not good sooty flat on the painting.  The next layer will be the next tone up and so on ending with streaky highlights of a warm white. 

You can see from my palette today that I have many shades of what artists call "grey."

 Grey to an artist is any color made up of opposite colors that lack crisp color and when describing them the adjectives end in "ish"   like greenish, pinkish, blueish.  You get it!!

On the house, work from the back toward the front just like you do the entire painting. 
The steps and handrails were the last thing I painted.


I am pretty happy with the results of my day.  I had fun with the chairs and swing on the porch. 

I can only imagine what the porch may have had on it all these years.  The obvious things missing are all the family members sitting in all the odd assortment of chairs, steps and benches. 
On one day I spent visiting Pop and his big family, they seemed to sit, hang and lean just about everywhere.  He was extremely happy that day to have everyone at home.  Pop's wife died almost 50 years ago and as I painted I wondered if she would approve of the placement of chairs, wreaths and yard decorations.  I and sure she does.
This home is in Madison, Florida.  Something tells me it is sturdier than anything built today!

Time for some rest.  As of right now, I am not sure of where I will put the trees in the foreground or how I will lay in the shadows from their broad branches, but that is why I will look forward to tomorrow.

Did you know that is why artists end to live long lives?
They have something to look forward to!


The Creativity Continues !

The Creativity Continues!


My little tricks...
    1.  Have a plan of what I want to accomplish.
    2. Don't pick up the brush unless I know what I plan to do next.
    3. Limit myself to one step at a time!!!

These little tricks keep the enthusiasm from causing chaos.  If the brush gets ahead of the painting, I will certainly have frustration and bad effects.At this point I have to put the lid on the palette, take a walk and tell myself what I did wrong.
This is "teaching oneself" how to paint.

If I don't know what I have done wrong, a rest from the work may reveal it later.  It is very possible to become overwhelmed with my own work and I don't mean "overly impressed."

If you get to a point of confusion, take a break and get out your old stand-by "How To Paint" book.
It might help you decide what to do or even better... what not to do.   Artists who paint with me in my workshops are always welcome to e-mail me an image for advice.

The first thing I painted today was the sky.  I made my family of colours putting the warmer and lighter colours near the horizon.  Using the palette knife like a butter knife, I put large dots of colorur in the area they belonged.  Using a big fat brush, I very quickly blended the colour working from light to dark.   Careful not to over blend... it will look like a sheet rock wall!

 I decided that adding the many little out buildings where Pop and family had made their syrup for so many years was too much for the little painting.  Instead, I added a distant tree line, the field where the cane had been growing just a month before harvest, and a couple of trees that would "anchor" the landscape.  One was a pecan tree and another was a pin oak.  Tree shapes are fun to study.


Begin with the basic tree skeleton.  Use a "rigger" or "liner" brush and have the limb shapes in your head before you begin.  Keep your hand relaxed or the tree will not look natural.  Keep the touch light as well or it will look heavy.  Trees are fun.  Imagine that it is dancing and you may get the "rhythm" and it will become a very fun step in your painting.


Make sure you do not make the colours too dark or too green!!  The foreground trees and grass will need to be a brighter green.  If the background is too green it will not show depth.  Keep it light and leave sky showing thru the branches.

  I love painting the foliage with a cheap natural bristle 1/2" or larger brush.
The brush does all the work.


Now the issues that had bothered me about the next "layer" of my painting are resolved. I took the same clean bristle brush and "lifted" the oil off the house roof and a little of the chimney on the left.  I have my original drawing if I need to refresh my memory of what it should look like.

And now...
I will take a break, do some cleaning around the studio and think about what I will paint next.   I will need to carefully plan just one step at a time here so I don't get ahead of myself and try too much at a time.

I am pleased with my progress and would really like to move ahead right now, but will myself time to study what magic has happened that I did not plan!

Suggestion: Paint in an area where there is other activity... people.  Leave your art things out where you can get to them.  Between steps in a painting, it is sometimes helpful to bring it to your living area.  I like having mine where I can glance at it from time to time while my mind may really be on other things.  I learn so much from my own work.

This going to be a good painting!!


Tuesday, January 8, 2013

The next step.... painting Pop's House

The painting begins.....


While I danced around the idea of putting paint on a perfectly good canvas, I squeezed a few colours on my palette.  The joke about the white canvas is that for any artist, the best painting is the one they will do next and a perfect work of art is the plain canvas before anything has been done!

Anyone who paints, beginner or old pro, the emotions are always the same when starting a painting.

 Above is a snapshot of my palette for the "under-painting."  All I need are very few colors.  There is no white on the palette.  Adding white early in a painting or too much at anytime will make the colour very "chalky."  Using a 3/4" brush and a one inch natural bristle brush I began to mix some of the tube colours with turp and medium to a watercolour consistency.  
You can see how thin they were in the photo.  

I like the look of the simple "under-painting" and many times it can be more exciting in freshness and emotional brush strokes than the finished work because the artist is more relaxed and unguarded.  There is a lesson here!  

From this point, I will begin to paint the things the farthest from me... the sky and moving closer and close in, I will complete the painting making the grass and shadows near the bottom of the canvas the last thing to paint... in essence.  

If you ever us this technique, you will be amazed at how much of the "under painting" actually becomes part of the finished work.  It is great because it keep us from becoming too fussy with details in areas that really don't matter as long as they are covered in paint.  Like life, it is sometime the things we do not do that make life and art good.  

Oh yes, I have a new colour on my palette this time...
Sennelier's "Orange de Chine"
or

"Chinese Orange"


It s very bright and intense, but for an underpainting, it will add a warmth that will give life to the old tin and unpainted house. 
The nest important step in any painting is to spend time with the canvas without painting to give yourself time to get acquainted. 


The magic happens when the painting tells you what should happen next.
Relax and just have fun. 


Sunday, January 6, 2013

Getting a good start in 2013....

      Getting Started in 2013!     

                                         A New painting in oil...                  

For my first painting this year, I will work in oil on a 14 x 18" stretched canvas.  The subject is one that has been on my "to-do" list for three years!  (Remember the purpose of my blog is to share the real facts!)
I have visited my site and taken many photos as well as borrowing some from family members to get all the info I feel I may need to complete the work.  Sometimes information not visible in the finished work are still very important to give the artist the confidence of knowing or "understanding" the subject.  I spent a day working on the first sketch which was done on tracing (calque) paper. 


It is important to work from several photos at once if not working on location.  Each photo will have information you will need to get the perspective and elements correct.  

 I transferred the drawing to the canvas.  By working and re-working the drawing on paper, I create a clean and neat drawing on the canvas by using carbon transfer paper.  

I like to varnish the canvas to "hold" the sketch in place.  I use dull varnish for oil paintings or "re-touch" varnish.  Spray the canvas outside and allow it to lay flat until dry.

The next step is very important:  Give yourself time to become familiar with your own sketch.  

Put the canvas on the easel and work on another project for the rest of the day while giving the new image time to "jell" in your head and minds eye.
I make a note card list of the first three steps I will paint tomorrow.  On this one, I plan to do an "under-painting."  Using tube colors, I will quickly paint very thin layers of the basic colours on the canvas.  We call this "killing the white" which gives the mind time to work our hue, density, contrast and the basic harmony of colours. 

I am excited about this work of art and 
so very happy with myself for finally getting this work under way. 

Let's make this a good year !

Happy New Year!

Lewis and I made our 2013 "work" list this last week and each year it seems to grow.  We reviewed last year's list and were proud of what we got done.  The new Cooking With Magnolias III was a big part of the year.  It seems that the simplest looking goals can take the most work.  Many thanks to everyone who sent us recipes.  They are wonderful!  If you have a recipe for
Cooking With Magnolias IV we would love to have you as a part of the the last book in this collection.  Each book is about 500 pages with sketches and short stories.  The cookbooks have been wonderfully received and they touch so many lives.  They have been a blessing to us as we seek new avenues to serve others and touch lives with the basic principals of our heritage. 
The three ring binder is wonderful and lays open for easy use.  Each recipe is on a separate page and printed large enough to read easily!!
 
For information on how to order, you can find all the information on my web site: