How to Paint Shadows

As promised, I want to help you learn to see or understand shadows. Once your learn to paint what you see and not what you think you "know," shadows are fun. They are so simple but painting them effectively can make your paintings sing.
Artists struggle to control what side of the brain is running the brush! If you let your left brain take over, the paintings will be hard to enjoy for the artist and the viewer. If you are a beginner, you will one day realize how to tell the difference. Like learning how to ride a bike, no one can describe to you how it feels, but once you get there, you know it!

The shadows we will look at today are the ones marked by the three arrows in the photo of the under-painting above. When doing your under-painting, use the same techniques of thinning your paint (or do the under-painting in acrylic thinned like water colours. If you lay on a think layer of paint, you will have to fight the textures in the final layer and it will take a long time to dry... not to mention the waste of paint.
Artists have traditionally loved painting table cloths and drapes that have gentle folds and wrinkles because they offer elements of style, texture and colour variety to the composition.

Note how shadows crawl over the folds int he tablecloth here. At this point you can still see my pencil lines. Not all areas are as I really want them, but I am moving in the process of making the decisions of what I want the final painting to look like.
Painting is an adventure of discovery.
If things did not amuse or surprise the artist...
painting would be dull, so enjoy the process.

Set an object near a lamp and turn out the other lights in the room. Do you see how the item makes a slight warm glow almost under the very near the object?
Notice the way the shadow is dark near the object or wrinkle in the cloth but it gently fades out as it drifts away from the object and the light source.
Warm v. Cool
Make a "family of colours." Mix several piles of real light blue violets, light blues, light blue greys.
Next, make a family of very light warm whites using Titanium white.
Add a tinge orange to one pile of white. Add yellow ochre to another white mixture.
Avoid Cadmium Yellow Light or Lemon Yellow as they make a "cool" white that seems to lose life or excitement.
You might want to tint another mixture of white with a bit of Alizarin Crimson for a wide variety.
Using these mixtures you can "sculpt" your table cloth to make it come alive.
Using the same recipes as mixed for the tablecloth, but a bit more intense (darker) in colour, add the shadows from your objects. My family of colours may be very different from yours, but that does not make either one of us wrong... just different.
I enjoy using a synthetic brush that is a "flat" style and about 1" wide. One of the top 2 in the photo are good for this, but one with white hog bristles could also do well.

Close one eye and forget what the objects are and study only the colours in the shadows...
letting the eye over-rule the mind.
The shadows are alive with colour. They are not flat shapes but are like the surface of a pond with a light oil covering. Pick and choose from all the colours of the rainbow, bouncing the colours around in the magical shadows to delight and entertain the eye.

Think about the textures of your cloth. Allow the brush to do all the detail work . If you use a bristle brush, you will get more texture than if you use a sable or fine synthetic brush. Don't over-brush.
If one stroke works great it is not always great to work it as if you are scrubbing the canvas. It will look labored and worst of all, you will mix all the different shade until you have one solid boring colour.
Learn to read your own behavior.
It is fun to get lost in a painting for hours, but the mind will grow weary and
pretty soon you will be brushing without thinking.
Time to quit!!
If you come to an area of a painting that is a real challenge for you, take it one like eating a whole pig... one delicious pork chop at a meal.
Limit what you plan to do. Plan in your head what you will do in your next paint session. How will it look? How will it feel to hold the brush and apply the paint to the area? If you can answer these questions, you will most likely have success.
There are numerous ways for us to check our artfor mistakes or over-all effect.
Try a few on my list:
1. Turn the art up side down.
2. Look at it in a mirror to get a reverse image so it is not the same painting you have seen too much.
3. Make a photo and open it on your desk top. If you have a good photo program, try changing the contrast to see if you like it better. Try other colour balance techniques.
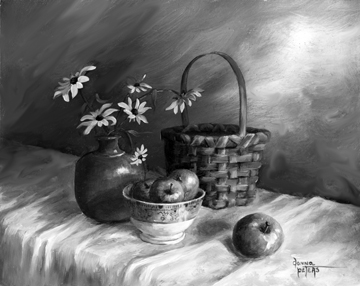
4. Take an image and change it to black and white.
5. Best of all, get away from it for a few days. Get your mind on another issue... like sketching outside. Later, put the painting in your living area but off to the side where your eye will catch it in different light and you will see it while doing other tasks. This can be so very revealing.
I hope you have enjoyed my summertime painting. I have made an apple cobbler from the green apples. The yellow daisies have wilted, but the summer of 2013 is captured. Even if I sell this original, thru the painting I have celebrated life and the many blessings in my life.
Count Your Blessings,
donna peters

A special message to the wonderful people that are painting with me this summer in my workshop:
You have heard all this in the class, but I know how our mind s can only process so much information at one time. I hope my Blog will give you a bonus lesson and keep you inspired long after we have finished our classes.
Thank you so much for asking me to share my art ability with you.
donna


